Maintenance and Troubleshooting
Stacker Ergolift / Ergonomic 3000
Lift-Rite® Stacker Maintenance
BATTERY CHARGING
- Park the Lift-Rite® stacker with forks lowered and floor locks engaged,
in a well-ventilated location.
- Do not leave the Lift-Rite® stacker in an area where it will obstruct
emergency exits, aisles, etc.
- Open battery compartment and leave battery compartment open during
charging to allow proper airflow.
- Plug charger cord into 110 volt AC/ 60 cycle outlet.
- Do not operate lift mechanism while charger is operating.
- The charging rate is controlled automatically to avoid battery from
being overcharged.
- Once the battery is fully charged, a "Charge Complete" LED on the
charger will illuminate.
- Unplug charger cord from outlet and store properly.
- Close battery compartment.
MAINTENANCE INSTRUCTIONS
Battery
- Always wear eye protection when inspecting battery.
- Keep battery water level approximately 1/2" above plates at all times.
- Use a hydrometer to check your battery acid. A fully charged battery
should read 1265 to 1275 (specific gravity).
- When adding water to battery, use distilled water only.
- Keep outside of battery clean and dry to avoid corrosion of terminals
and connectors.
- Wet Cell Battery Dimensions: 12-3/4" long, 6-3/4" wide, 9-3/4" high
(Including terminals) - Type - RV27
- Gel Cell Battery Dimensions: 12-3/4" long, 6-5/8" wide, 9" high - Type -
RV24
Hydraulic System
- Do not add hydraulic oil unless there has been a leak.
- Use only BP-SHF32 or equivalent hydraulic oil.
- The oil level should be approximately 3/4" below the top of the tank.
- Check oil level only with fork (carriage) in lowered position.
Lubrication
- Clean lifting chains and inside of channels periodically and lubricate
lightly with light oil or multi-lube.
- Do not lube tapered surface of channels in order to avoid rollers from
sliding instead of rolling.
- On Lift-Rite® telescopic models, the guide rollers mounted on top and
inside of the outer channels must be lubricated periodically.
- Swivel casters are equipped with grease fittings for lubrication.
- Straddle load rollers should be removed twice yearly and bearings
cleaned and packed with grease.
TROUBLESHOOTING
If the motor is not running after the battery has been recharged, clean and
check all electrical connections. If motor is still not running, have an
electrician or a qualified mechanic locate the problem. Do not attempt to use
jumper cables as one small spark could blow up the battery and result in costly
injuries.
If the motor is running but the forks are not raising, your valve spool could
be seized or out of adjustment. This can be easily checked by taking a
screwdriver and depressing the valve spool while the motor is running. The
clearance between the cam and adjusting screw should be .010 - .015. No
clearance or not enough clearance will result in your load lowering slowly by
itself after the motor is shut off. Too much clearance will reduce your lowering
speed. If the motor keeps on running after the control handle is released, your
solenoid is sticking and should be replaced.
Make sure your lifting chains are evenly adjusted to avoid binding of apron
and overloading of chains.
When ordering parts, always state the Lift-Rite® model number, serial number,
capacity and load center of your stacker.
Return to Top
Lift-Rite® Ergolift/Ergonomic3000
Lubrication
All pivot points in the LiftRite® Ergo-Lift are equipped with permanently
lubricated bushings and bearings. To increase bearing life, it is recommended
that a few drops of light machine oil be applied at each pivot point every 6
months. The main bearing in the thrust plate is equipped with a grease zerk.
This should be greased every 6 months.
Hydraulic System
Your hydraulic system is maintenance free. Do not add hydraulic oil unless
there is or has been a leak. Use Sunoco Sunvis 832 oil or equal. Any other oils,
fluids or solvents can damage your hydraulic system. With the Lift-Rite® Ergo-Lift
in its lowered position fill the reservoir through the oil plug hole until the
oil is even with the plug hole.
Battery (I2 Volt)
Keep the battery water level 1/2" above the plates at all times. If it
becomes necessary to add water use only distilled water.
If you suspect that your battery is not charging fully, you can check your
battery acid using a hydrometer. A fully charged battery should read between
1270 and 1275.
Gel Cell Battery dimension:
6-3/4" wide x 10-7/8" long x 9-7/8" high - Type - RV 24
Wet Cell Battery dimension:
6-3/4" wide x 12-3/4" long x 9-7/8" high - Type - RV 27
TROUBLESHOOTING MANUAL PUMP
|
Condition
|
Possible Cause
|
Action
|
| Lift-Rite® Ergolift does not raise manually. |
An air lock in the hydraulic system. |
Pull control lever to lowering position. Pump handle several times (6-8 pumps
in most cases) to bleed air from pump.
Then pump normally to operate LiftRite® Ergolift. |
| |
Foreign particle or dirt in valve body. |
Loosen the high pressure screw Part# PR8547 in parts breakdown. Operate pump manually several times then tighten the high pressure screw |
|
|
Neutral
position may be set too high. |
Turn
neutral valve Part#PR8548 in parts breakdown counter-clockwise until pump action raises Lift-Rite® Ergolift. |
|
|
Bad or
worn seal(s) at top nut |
Check top
of cylinder housing for signs of oil leak. If leak is visible, replace Part# PR8529 in parts breakdown |
|
Lift-Rite®
Ergolift raises without load (manually) but will not raise loaded. |
Relief
valve in manual pump is set too low. |
The relief
valve is factory set to protect the Lift-Rite® Ergolift from overloading. In the event that the adjustment was altered, turn relief valve Part # PR8557 in parts breakdown clockwise until pump operates
satisfactory. The adjustment should be made with a load or no more than capacity which is indicated on the serial plate. Damage as a result of overloading voids the Lift-Rite® Ergolift warranty. |
|
Lift-Rite®
Ergolift does not lower manually. |
Release
lever linkage caught or broken (eg. damaged chain links or rivets.) |
Visually
inspect the release lever linkage. Replace any broken parts or clear any obstructions. |
|
|
Lock nut
on the release linkage is out of adjustment. |
Raise the
position of the lock nut Part # PR8520 in parts breakdown on the adjusting bolt. |
|
Handle will not lower without raising LiftRite® Ergolift |
Neutral
position set too low. |
Turn
neutral valve Part # PR8548 in parts breakdown clockwise until handle lowers without raising the LiftRite Ergolift. |
TROUBLESHOOTING ELECTRIC PUMP
|
Condition
|
Possible Cause
|
Action
|
| Handle will not lower without raising Lift-Rite® Ergolift. |
Neutral position set too low. |
Turn neutral valve Part # PR8548 in parts breakdown clockwise until handle lowers without raising the LiftRite® Ergolift. |
|
Lift-Rite®
Ergolift does not raise electrically (motor does not operate.) |
Battery
is not connected. |
Raise
the LiftRite® Ergolift manually and connect wires Part # PR8501 and PR8509 to the negative battery terminal. |
|
|
Fully
discharged battery |
Connect
the charger as described under "Operations" in the LiftRite® Ergolift manual |
|
|
Loose or
broken electrical connection. |
Inspect
and tighten all connections in the electrical system. Refer to the wiring diagram for proper connection. |
|
Lift-Rite®
Ergolift does not raise electrically (motor operates). |
Damaged
pump shaft. |
Electrical power pack must be replaced. |
|
Lift-Rite®
Ergolift does not raise electrically (motor operates). |
Spool in
solenoid valve for remote control is jammed. |
Replace
solenoid valve located on power pack. |
|
Electric power pack labors unusually while lifting or does not lift heavy loads. |
Sleeve
bearing in head assembly of the motor needs to be replaced. |
Have the
motor serviced by a qualified motor repair shop. |
|
|
Brush
set in the motor needs to be replaced |
Have the
motor serviced by a qualified motor repair shop. |
|
|
Excessive dirt or dust in the electric motor housing |
Have the
motor serviced by a qualified motor repair shop. |
|
Motor on power pack produces a growling sound. |
A worn
bearing on the motor shaft. |
Have the
motor serviced by a qualified motor repair shop. |
|
Lift-Rite®
Ergolift fails to raise fully. |
Obstruction(s) restricting movement. |
Safely
clear or remove obstruction. |
|
|
Oil loss
in hydraulic system. |
The
LiftRite® Ergolift must be in the lowered position to add hydraulic oil. Once the unit is lowered, remove filler screw on the outside of the cylinder housing to add hydraulic oil. |
| Lift-Rite® Ergolift raises without load (electrically) but will not raise loaded. |
Relief valve at the power pack requires adjustment. |
Refer to the parts breakdown for the location of the power pack relief valve. |
|
|
Relief
valve on manual pump requires adjustment. |
The
relief valve is set at the factory to protect the LiftRite® Ergolift from overloading. However, in the event that the adjustment was altered, place a load on the LiftRite Ergolift® no greater than unit
capacity. Turn the outer nut 3/4 to 1 turn counter clockwise. Then with a 3/16" Allen key turn the screw clock-wise while engaging the electric pump to lift. Adjust the relief valve to
the point where the load will lift. Re-tighten the outer nut 3/4 to 1 turn clock-wise to lock the setting. A relief valve setting that exceeds the load capacity of the LiftRite® Ergo-lift
will damage the unit and void all warranties. |
TROUBLESHOOTING BATTERY AND CHARGER
|
Condition
|
Possible Cause
|
Action
|
| Battery in the LiftRite® Ergolift is not charging, |
No connection between the battery and charger. |
Lower the LiftRite® Ergolift completely and connect the black housing connectors. One is located at the end of the yellow cord from the battery and charger. The other is fastened to the side of
the battery box. |
|
|
Battery
is not connected |
Raise
the LiftRite® Ergolift manually. Connect wires Part # PR8501 and PR8509 to negative battery terminal |
|
|
Water
levels in the battery are low. |
Remove
battery box cover plate and inspect battery water levels. Add distilled water if battery levels are low. Units previous of SN E958-95 require battery removal for service |
|
|
Battery
has expired. |
Replace
the battery. |
|
|
Battery
charger has expired. |
Replace
the battery charger. |
TROUBLESHOOTING REMOTE CONTROL
|
Condition
|
Possible Cause
|
Action
|
| Battery charger indicator LED does not operate when connected to battery. |
Battery
terminals are not properly connected. |
Raise the
Lift-Rite® Ergolift manually and connect wires Part # PR8501 and PR8509 to the negative battery terminal.
|
| |
Battery charger has
expired. |
Replace the battery
charger. |
| Optional
remote control not lifting LiftRite® Ergolift |
Remote control is not
connected. |
Plug the remote
control cord into the receptacle located on the top of the battery box. |
| |
Problem is not
related to remote control. |
Refer to Section
"Ergolift does not raise electrically". |
| Optional
remote control not lowering LiftRite® Ergolift |
Remote control is not
connected. |
Plug the remote
control cord into the receptacle located on the top of the battery box. |
| |
Battery voltage is
too low and the lowering solenoid will not shift. |
Lower unit manually.
Charge battery as described in owners manual. |
| |
Solenoid valve is
damaged. |
Replace solenoid
valve located on power pack. |
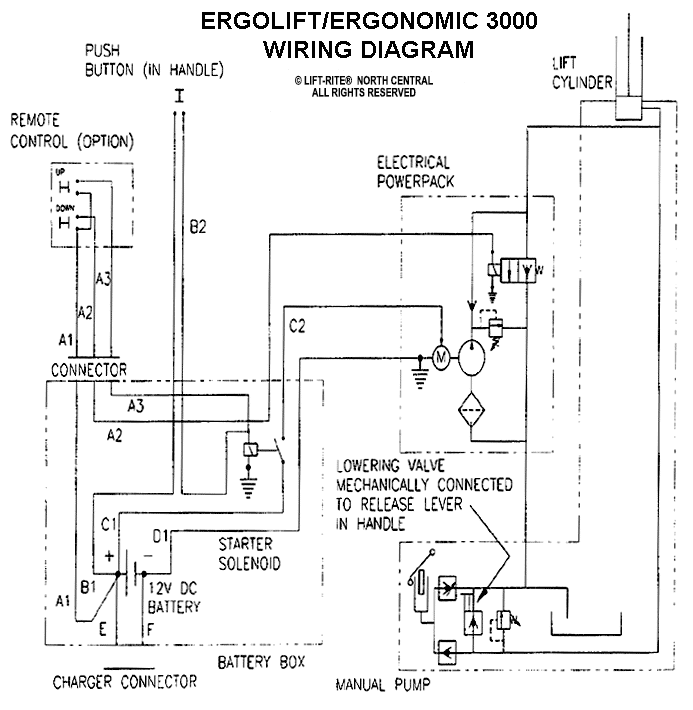
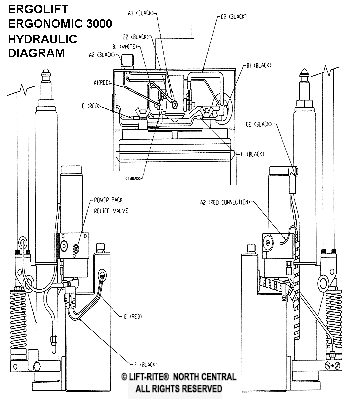
WIRING AND HYDRAULIC DIAGRAMS
|

|

|
WIRING DIAGRAM
CLICK TO SEE LARGER IMAGE
|
HYDRAULIC DIAGRAM
CLICK TO SEE LARGER IMAGE
|
Return to Top
|


